DESK SETUP
How to Organize Cables on a Desk: A System That Actually Stays Neat
Adhesive clips fail, twist ties migrate, and the nightstand keeps eating chargers — here's a repeatable cable-management setup that survives adding and removing devices.
There are two states any desk drifts toward: the day-one Zen photo you took after setup, and the reality four weeks later — a charger that's disappeared behind the desk, a USB cable snaking across the surface to a phone that isn't there anymore, and a nest under the monitor that fights every attempt to reorganize it. Adhesive clips fail off finished wood; twist ties come loose the second a cable moves; the box of Velcro straps you bought lives in a drawer.
The system below is what actually holds. It separates cables into two categories with different jobs — the always-there desk backbone, and the come-and-go charging cables — and it uses the right tool for each. Do this once and re-docking a laptop turns from a ten-minute cable hunt into a ten-second plug-in.
Audit and cull before you organize anything
Unplug everything and sort your cables into three piles: use daily, use sometimes, and haven't touched in six months. That last pile is the reason most cable-management projects fail — you spent an hour tidying cords for a printer you replaced two years ago, a phone you sold, and a monitor still in the box. Retire them to a labeled bin in a closet (or throw the frayed ones out) and you've already fixed half the problem.
Now group what's left by function, because they need different homes: power to devices (monitor brick, laptop charger, dock, lamp), data (monitor cable, USB hub, ethernet), and the come-and-go set (phone, watch, earbuds, tablet). The first two never move once you place them; the third moves constantly. Trying to solve both with the same tool is why every cable-management guide you've followed eventually collapses.
The backbone: route power and data once, then leave it alone
For the always-there set — monitor, laptop dock, hub, lamp — the goal is to route them under and behind the desk in a way you never have to think about again. Mount a power strip to the underside of the desk with adhesive-backed screws or a stick-on tray so it isn't sitting on the floor collecting dust and pulling cables down with its weight. Feed the desk-mounted device cables through a small grommet hole (or over the back edge) and drop everything into a cable channel or a length of split braided sleeve that runs the whole width of the underside.
The two commonest routing paths in tested desk setups are: behind the monitor arm vertically (display and hub cables go straight up out of sight), and along one desk leg horizontally to the outlet. Bundle each group with reusable Velcro straps every foot or so — Velcro handles adding and removing a cable in ten seconds, which zip ties don't. This part of the setup should look boring and permanent, because it is.
The come-and-go cables: this is where every system fails
Charging cables are the hard problem. Their job is to be visible, reachable, and ready to plug in — while also not sliding off the desk, tangling with each other, or getting sucked down behind the monitor the second you unplug your phone. Adhesive clips look like the answer for about a month, then peel off with a chunk of finish and take the cable with them. Draping the cord over the desk edge with a clip on top lasts until the cable finally wins the tug-of-war and dives to the floor for good.
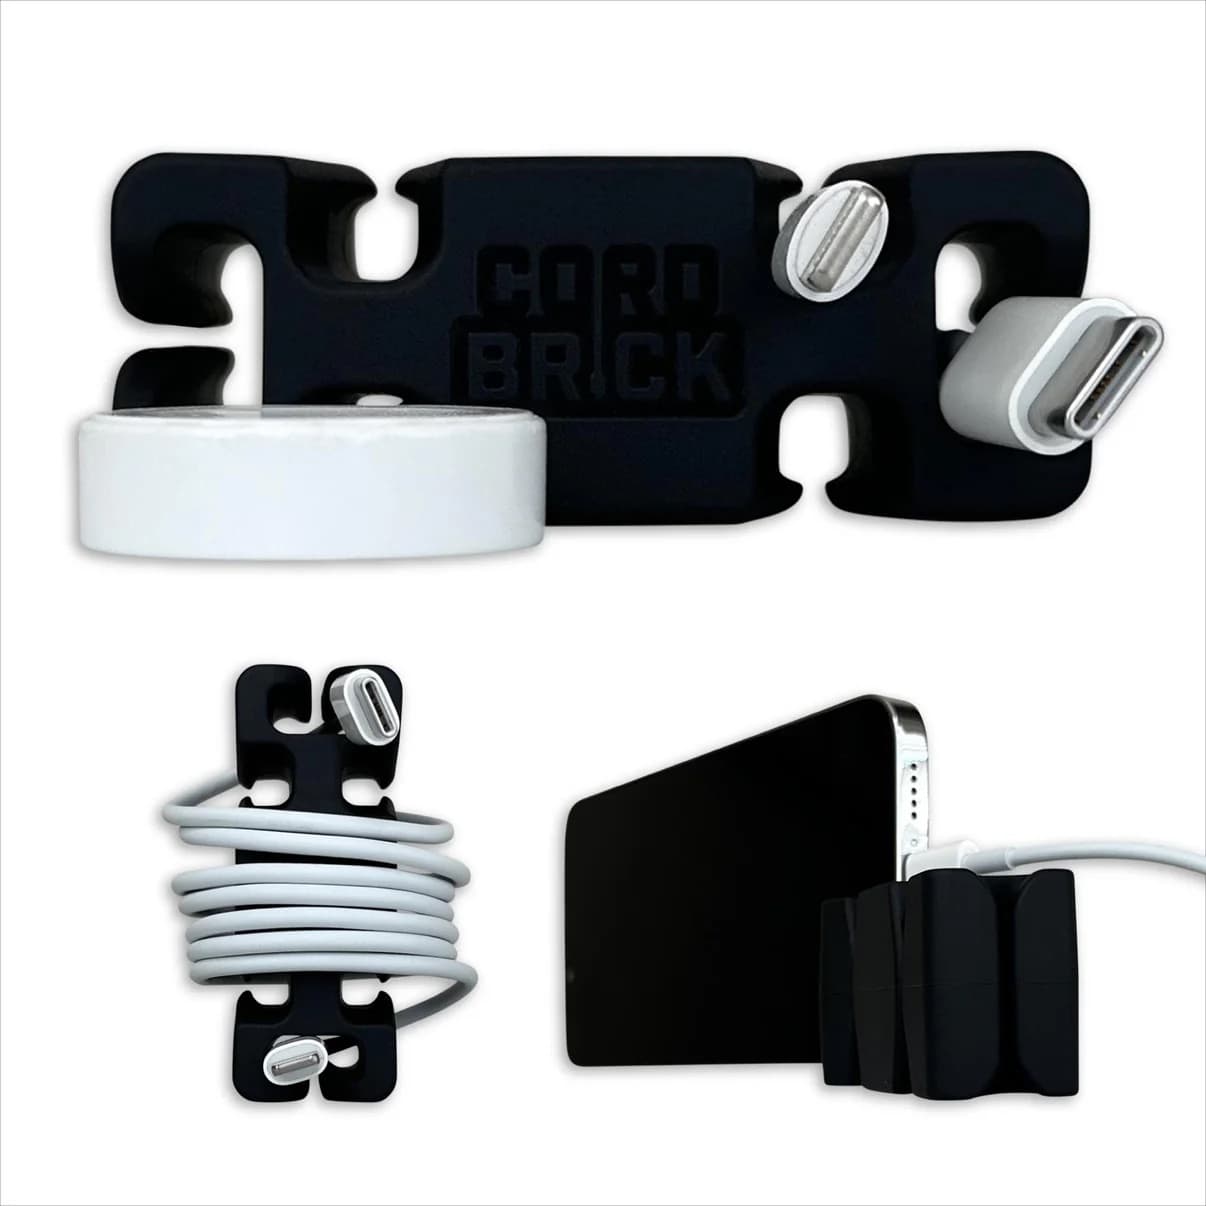
The system that survives is a weighted holder: something too heavy for cable tension to move, that grips each charging cord end at the ready and gives you a place to wrap the slack. A silicone weighted brick like the CordBrick is the honest recommendation here — it grips up to eight cables at once with no adhesive, moves anywhere on the desk without leaving residue, and its own weight is the anchor. Phone cable, watch charger, earbuds cable, spare USB-C — each in a notched slot, each grabbable in one motion.
Wall-to-desk: the six inches that ruin most setups
The single ugliest span in a home-office setup is the last six inches between the desk edge and the wall outlet — the place where power bricks pile up on the floor, dust bunnies breed, and a robot vacuum finds a fresh charger to eat every week. Fixing it isn't glamorous but pays off every day: mount a small surge protector or a floor-standing outlet-post so the cables run down one desk leg, into a single visible strip at ankle height, and nowhere else. Skirting-board raceway (a paintable plastic channel with a snap-on lid) hides the runs to the outlet if you rent and can't drill.
If your desk sits away from the wall, use a cable spine or a magnetic cable chain along the desk's back edge so the bundle drops in one clean vertical run instead of a chaotic swag. Standing desks add a twist here: whatever routing you build has to survive the desk moving up and down twenty times a week, so extra slack, coiled and Velcro'd to the leg, is not optional — it's the whole trick.
The 30-second re-dock: what a good setup buys you
The metric that matters for a home office isn't how the setup looks on day one; it's how long it takes to re-dock your laptop after working from a coffee shop. In a good system, you sit down, drop the laptop on the desk, plug in the USB-C dock cable (one connector, held ready in the weighted brick), and you're back to two monitors and full audio in under thirty seconds. The come-and-go cables are visible and ready; the backbone never moved.
If your setup fails that test, the fix is almost always where the come-and-go cables live — which is why we spent this whole guide getting that part right. A separate quality-of-life win worth mentioning: an Anker nano charger shrinks the wall-side power brick footprint dramatically, freeing up outlet slots and cutting the visible mass on the wall. A cleaner charging station is downstream of just having less charger on the wall in the first place.
What to skip: hacks that look great in photos and fail in practice
Two popular 'solutions' deserve a warning. Rolling cables into tight coils secured with rubber bands looks tidy and slowly damages the cable — repeated tight bending is exactly what breaks the internal conductors near the connector and turns a charging cable into a $12 replacement. Loose loops the size of a coffee mug, held with Velcro, last for years.
The other trap is the all-in-one cable management box — the plastic case you're supposed to stuff a power strip and all its bricks inside. On a real desk it becomes a fire-risk oven (bricks running hot inside a closed plastic box), and it commits every cable in it to a single location you can't easily change. An open under-desk tray with airflow is safer, easier to service, and doesn't turn cable-swapping into a crime scene.
Read our CordBrick review
The weighted silicone brick that grips up to eight cables at once with no adhesive — the come-and-go part of the system, solved permanently.
Read our CordBrick reviewFrequently asked questions
What's the best way to organize cables on a desk?
Split your cables into two groups and treat them differently. The always-there backbone (monitor, laptop dock, hub, lamp) gets routed once through an under-desk tray or sleeve with reusable Velcro straps. The come-and-go set (phone, watch, earbuds) needs a weighted holder that grips each cable end at the ready — a silicone brick like the CordBrick outperforms adhesive clips because cable tension can't move it.
Do adhesive cable clips actually work?
For a month or two, on smooth painted surfaces. On finished wood, textured desks, or fabric-covered surfaces they either fail immediately or eventually peel off with a patch of the finish. And they commit you to one arrangement forever — the moment you swap devices, you're peeling and re-sticking. Weighted holders are the repositionable alternative.
How do I stop my charging cable from falling behind the desk?
Anchor the cable end in something heavier than the cable's tug. A weighted silicone brick works because its mass, not adhesive, is the anchor — the phone cord tugs, the brick doesn't move, the connector stays at the desk edge ready to grab. Adhesive clips solve the same problem for a while, then fail.
How do I hide cables between the desk and the wall?
Route everything down one desk leg into a small floor-mounted surge protector or outlet-post, so only one visible vertical run exists. Rent-friendly: paintable skirting-board cable raceway hides the horizontal run to the outlet without drilling. If the desk sits away from the wall, use a cable spine or magnetic chain along the back edge for one clean vertical drop.
Are cable management boxes safe?
Marginally, at best. Sealed plastic boxes stuffed with power bricks run hot — bricks are designed to shed heat into open air, not into a closed container. An open under-desk tray is safer, cooler, and easier to service. If you love the aesthetic, at minimum choose a box with generous ventilation slots and don't overfill it.
How do I manage cables on a standing desk?
Add extra slack to every cable that reaches the desktop, coil the slack loosely at the base of the desk leg, and secure it with Velcro so the coil doesn't unwind as the desk lifts. Cable chains and spines designed for standing desks (a spine attaches to the underside; a chain flexes as the desk moves) beat any static routing.
TopCrate is reader-supported. When you buy through links on our site we may earn an affiliate commission, at no extra cost to you. Content is for general information and isn't a substitute for professional advice.