HOW TO
How to Use Liftly Insoles: Sizing, Trimming, Fitting, Washing and Keeping the Return Option Open (2026)
Liftly insoles go in with three steps: pick your size range, trim to your shoe and slide them in. Here's how to do each step without wasting a pair, what ReAthlete says about washing and moving them between shoes, and the one thing to do before you trim if you might want a refund.
To use Liftly insoles, take the factory insole out of your shoe, trace it onto the Liftly insole (or follow Liftly's printed sizing lines), trim along the line, and slide the Liftly insole in where the old one was. That's the whole setup, and ReAthlete, the company that makes Liftly, calls it a 60-second upgrade. The step people get wrong isn't the trimming. It's trimming before they've checked the fit, because a cut insole is unlikely to count as unused if you later want to send it back.
Below is the full process as ReAthlete describes it on the official Liftly offer page and its own product page, plus the details those pages leave out: how to pick between the two size ranges, how to trim without cutting too much, what to expect from the massage nodes in the first days, how to wash them, and when to swap pairs between shoes. If you haven't bought yet, our full Liftly insoles review covers whether they're worth it, and our guide on where to buy Liftly insoles compares the official prices.
How to use Liftly insoles: the three official steps
The Liftly offer page at getliftlyinsoles.com lays out setup as three steps: cut to fit, insert into your shoe, and enjoy all-day comfort. ReAthlete's own product page on reathlete.com breaks the same process into four: remove the flat factory insoles that came with your shoes, trace your old insole or follow the precision sizing lines, trim for your shoe shape, and insert.
Neither page mentions glue, tape or any tool beyond something to cut with, and nothing about the process is specific to one kind of shoe. ReAthlete's FAQ says you can move the insoles from work boots to gym sneakers, which tells you the design assumes a shoe with a removable insole and enough room for a cushioned replacement.
That last point matters before you start. Liftly replaces your shoe's insole; it doesn't sit on top of it. If your shoe's insole is glued in, or the shoe is a slim dress shoe with no removable footbed, Liftly isn't designed for it. Check that the factory insole lifts out before you order for a specific pair.
Step 1: pick the right Liftly size range
Liftly comes in two base ranges, listed on ReAthlete's product page as Standard (37-41) and Large (42-47). Those are European-style sizes. ReAthlete's FAQ puts it simply: choose your range, then trim it down for a custom fit. The insole starts at the top of its range and you cut it down to your shoe.
Because you can only cut an insole smaller, never larger, the rule is easy: if your size sits at the top edge of the Standard range or you wear roomy shoes, the Large range gives you more material to work with. If you're well inside the Standard range, Large just means more trimming. The offer page doesn't spell out the size ranges, so confirm the size option during checkout. Colors on ReAthlete's page are Electric Blue, Classic Black and Modern Grey.
Step 2: trim Liftly to your shoe without cutting too much
Pull the factory insole out of the shoe you plan to use first. ReAthlete gives you two ways to get the outline: trace the old insole onto the Liftly insole, or follow the printed sizing lines. Tracing is the more accurate option for a specific shoe, because two shoes in the same size can have different toe shapes.
Line the heels up first. Liftly's heel area is its cushioned impact zone, and the length adjustment happens at the toe, so set the old insole's heel into Liftly's heel cup and trace around the front. Then trim a little outside your line. You can always take off another sliver after a test fit; you can't add material back. Sharp scissors give a cleaner edge than a craft knife on soft foam.
Test the fit before you do the second insole. Slide the trimmed one into the shoe and press it flat. If the front curls up against the toe box or the edges ride up the sides, trim a little more and try again. When it lies flat from heel to toe, use it as the template for the second foot, flipped over, so both match.
Before you trim: keep one Liftly pair returnable
This is the step most how-to guides skip, and it's the one that can cost you money. The offer page promises a 30-day money-back guarantee and says you can return Liftly hassle-free. ReAthlete's written refund policy is stricter: you have 30 days from delivery to start a return, items must be in new condition (unused, clean, undamaged and free from signs of wear) in the original packaging, returns must be approved by email first, and a $15 return and processing fee applies per order. Return shipping is on you, and refunds go out within 15 business days of inspection.
A trimmed insole is hard to describe as unused. So before you cut, slip the untrimmed insole into your shoe and stand on it for a minute to see whether you like the arch and the nodes. If you bought a three- or six-pair bundle, trim one pair and leave the rest sealed until you're sure. That keeps the refund option open on most of the order.
Step 3: insert Liftly and what the first days feel like
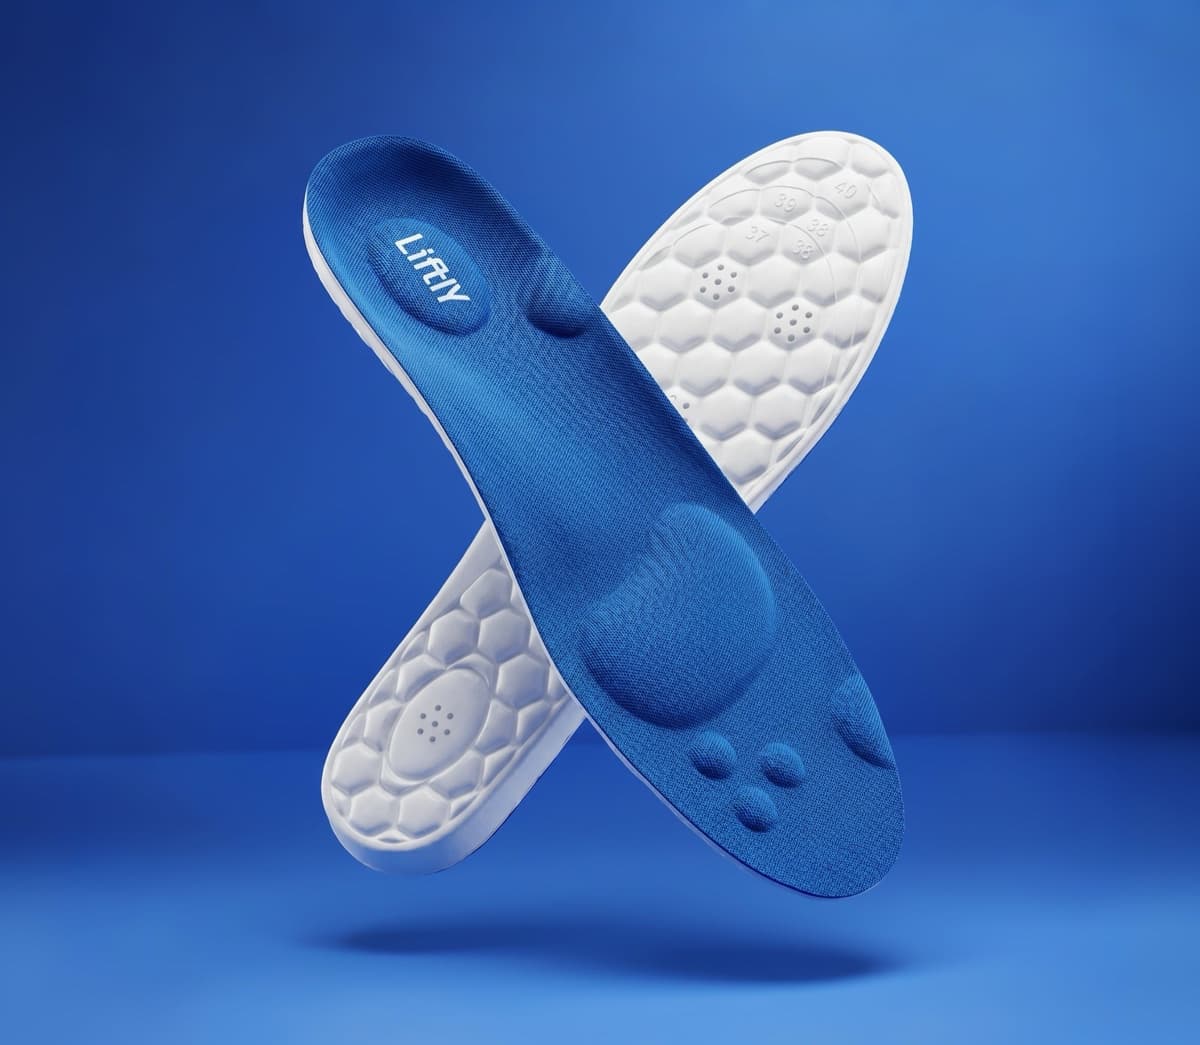
Slide the trimmed insole into the shoe heel first, then press the front down so it sits flat under the toes. Liftly's design zones, as ReAthlete describes them, are a cushioned heel zone it calls the Impact Shield, arch support through the midfoot (the Active Bridge), a reinforced forefoot for push-off (the Power Launch) and support along the outer edge (the Balance Rail), plus raised Anatomical Support Nodes underfoot and a high-density foam base.
The nodes are the part you'll notice first. ReAthlete's FAQ describes them as a gentle micro-stimulation rather than something that should bother you. Liftly's pages don't give a break-in schedule, so how quickly you adjust is personal. If the nodes or the arch feel like too much at first, a sensible approach is to wear them for part of the day and build up, rather than starting with a 12-hour shift.
Liftly is a comfort and support insole, not a custom orthotic. The offer page lists foot conditions it says Liftly helps relieve pain from; those are the brand's claims, and we haven't seen studies behind them. If you have ongoing foot pain, see a podiatrist, and our guide to insoles for standing all day covers when an off-the-shelf insole is enough.
How to wash Liftly insoles and keep them fresh
ReAthlete's product FAQ gives one cleaning instruction: hand-wash with mild soap and air dry. It says this preserves the foam and keeps the colors bright. The offer page adds that Liftly is designed so you can clean away dirt, sweat and odors.
Air dry means no tumble dryer and no radiator. Take the insoles out of the shoes to wash them, rinse out the soap, press out the water rather than wringing the foam, and let both the insoles and the shoes dry fully before you put them back together. Neither Liftly page mentions machine washing, so we'd avoid it.
Moving Liftly between shoes, and when to buy more pairs
ReAthlete's FAQ says yes, you can move Liftly between shoes, and that the foam is built to keep its feel when you do. The catch is the trim. Once you've cut a pair to one shoe's shape, it fits that shoe best. A pair trimmed for wide work boots may be loose in narrow sneakers, and a pair trimmed for sneakers may be short in boots.
That's where the bundles make sense. On November 8, 2026, the Liftly offer page listed one pair for $29.99, three pairs for $59.98 and six pairs for $89.97, with free US shipping. ReAthlete's own store lists a single pair at $39.99. If you want Liftly in two or three pairs of shoes, trimming a dedicated pair for each is easier than swapping, and the three-pair bundle works out to about $20 a pair.
Liftly carries a 1-year warranty. ReAthlete's warranty page says it covers manufacturing defects in materials and workmanship under normal use, and replacements need proof of purchase from the past 12 months. Support is at support@reathlete.com or 1 (757) 414-7772 for warranty questions, and returns go through support@reathlete.pro.
Liftly vs heel lifts and other look-alike inserts
Searches for Liftly often turn up heel-lift and height-increase inserts, the wedge-shaped pads sold by many marketplace sellers. Those are a different product from a different company: they raise the heel, and they don't follow the steps above. If what arrived is a small wedge rather than a full-length insole with nodes and a trim guide, it isn't Liftly. Akusoli is also a separate brand from a different company; our Liftly vs Akusoli comparison covers how the two differ.
The official Liftly sellers are getliftlyinsoles.com and reathlete.com, and our are Liftly inserts legit guide covers what to check before you pay. Disclosure: TopCrate earns a commission if you buy Liftly through our link, at no extra cost to you.
Read our full Liftly review
Arch support, cushioning, the price per pair, the 30-day guarantee and whether Liftly is worth it over a drugstore insole.
Read our full Liftly review →Frequently asked questions
How do you put Liftly insoles in your shoes?
Take out the shoe's factory insole, trace it onto the Liftly insole or follow Liftly's printed sizing lines, trim, then slide the Liftly insole in heel first and press it flat. ReAthlete says setup takes about a minute.
Do you have to cut Liftly insoles?
Usually, yes. Liftly comes in two base ranges, Standard (37-41) and Large (42-47), and you trim it down to your shoe. Test the fit before you cut, because ReAthlete's return policy only covers unused items.
Can I return Liftly insoles after trimming them?
Probably not for a refund. ReAthlete's written policy requires items in new, unused condition in original packaging, with a $15 return fee per order. Stand on an untrimmed pair first, and keep spare pairs from a bundle sealed until you're sure.
How do you wash Liftly insoles?
ReAthlete says to hand-wash them with mild soap and let them air dry. Take them out of the shoes, avoid the dryer, and let them dry fully before you put them back.
Can you move Liftly insoles between shoes?
Yes, ReAthlete says they're built to be swapped. But a pair trimmed for one shoe fits that shoe best, so many people buy a bundle and trim a pair for each shoe.
How long does it take to get used to Liftly insoles?
Liftly doesn't publish a break-in schedule. ReAthlete describes the massage nodes as gentle. If they or the arch feel strong at first, wear them for part of the day and build up.
TopCrate is reader-supported. When you buy through links on our site we may earn an affiliate commission, at no extra cost to you. Content is for general information and isn't a substitute for professional advice.